Tuesday, June 21, 2011

These Are a Few of My Favorite Things...

 Cheese, Broccoli & Cremini Mushrooms
Always a fabulous combination.


 Tonight's dinner included these most amazing ingredients, combined with deliciously healthy barley.. Recipe to come very soon! 
 Unfortunately, my dearest computer decided not to wake up from it's nap a couple of weeks ago. Thank goodness for my dear man Nate, so I can still do all of the important email and occasional Facebook business. Working on my blog, using quality photos, has now  become a greater challenge.

I have been cooking up a storm, as usual and I have much to share. Hang in there with me, kind readers. I will be posting in a limited capacity until I get my dear MacBookPro, fixed & good as new. I can't wait to share the many Summertime treats we cook up!

Tuesday, May 31, 2011

What's For Dinner - Nate's Alternative Picnic Meal!


Grilled Portobello "Burger"
Sauteed Swiss Chard  & Garlic
Nate-Style Potato Salad

Nate is responsible for this wonderfully flavorful meal. He marinated the portobello mushroom with balsamic vinegar, liquid aminos and spices. The potato salad turned out dreamy, especially with the celery and carrots he added! He sauteed lots of garlic and I stirred in the Swiss chard, adding a little balsamic and salt. I had about half of his serving (shown in the photo) and I was completely satisfied AND looking forward to lunch leftovers tomorrow! Yum!

Saturday, May 28, 2011

Tis The Season For Fresh Strawberry Jam!


Strawberry season! We missed it last year, so this year we made sure to get to the farmer's market in time to add to our jam collection. We are still savoring the last couple of jars of peach and pear jams, and apple jelly. Now it's time to finish those off and make room for a new season of canning goodness.

Making strawberry jam is pretty easy, compared to the work involved in canning other fruits and veggies. While I won't be covering precise step by step instructions on how to make the jam, I am hoping the the photos and descriptions below are helpful in showing exactly how easy it is to make this precious addition to the pantry. This was the first time we made the stuff, and it still turned out amazingly delicious!

If you have never canned, you should read up on it before attempting to can anything.  Having sterile jars and lids and following all proper procedures will prevent a life threatening illness called Botulism, that can result from improperly canned food. Please do not take the risk and try canning before you have done some research and feel comfortable with all of the steps necessary to can food safely. Check out this link from the National Center for Home Food Preservation and get all the info you should need. http://www.uga.edu/nchfp/how/general.html

This is what we used to get started.. 2 gallons of freshly picked strawberries from the farmer's market & 2 boxes of fruit pectin to make 2 batches. We like to get the kind that allows for "No Sugar Needed Recipes", as we like to use less sugar. The recipe we used did call for sugar, but about half of the usual amount. Directions on how to make the regular and low sugar recipes are in the box of fruit pectin.

First, you have to wash and cut the tops off the berries. This takes a little while, but not even close to the amount of time involved in apples and peaches, with having to peel & core them. There is no need to slice them either! Just toss the strawberries in a blender or food processor to puree. You will need to wash jars and lids and have ready to use before starting to prepare the strawberries for canning. You should have your lids in a small pan of water on low heat, to soften the seal.


Following the fruit pectin box directions, you will cook the pureed strawberries, adding a sugar and fruit pectin mixture and allowing to boil only a few minutes.

You should already have the sterile jars ready for filling, as it is important to get the cooked mixture in the jars and in a water bath as quickly as possible.


Once the jam mixture is fully cooked, ladel it into the jars, filling about 1/8 of an inch from the top. Wipe the rim of jars before putting on the lid and rings on the jars. Fill your jar rack and you are ready for putting in the already boiling water bath.


Canning can make the house very hot, so we used an outdoor propane cooker for the water bath processing. It's a lifesaver, especially since we have no AC!

Processing times vary by elevation. Be very careful removing the jar rack once the processing is complete. The jars are very, very HOT and can cause a lot of damage if falling and breaking at your feet!


 Place the jars on a rack to cool. Within a couple of minutes, you should start hearing the tabs on the lids starting to pop. This lets you know that you did the job right and they are properly sealing! I love that POP sound!

After the jars have fully cooled, press on the center of each lid, to make sure they are completely sealed. If you are able to press the lid and it pops back up, your jar is not fully sealed and the contents are now perishable. Don't worry about it being a waste, just put it in the refrigerator and eat within a week or two.


It's a beautiful and tasty payoff for only a couple of hours of work! With our 2 gallons of fruit, we made about 16 half pints of jam and had a few pints of leftover pureed strawberries that we froze for making syrup, smoothies or whatever else we can dream up. Leftovers are always a plus! We will be enjoying the sweet, fresh taste of strawberries all year long. And if you're lucky, we might even share some!

Saturday, May 7, 2011

What's For Dinner - Easy, Delicious & Amazingly Nutritious Soup!

We were working hard for a few hours this evening making strawberry jam! (Post on that coming soon.) We wanted an easy meal and this soup fit the bill, as it was made with stuff we generally have around at all times. Our homemade veggie stock was the inspiration for this meal. To the quart of veggie stock, I added equal parts chicken stock, then egg noodles, fresh garlic, baby bellas, carrots, home grown kale, and to top it all off.... white miso paste. Absolutely scrumptious and packed with vitamins & minerals! I didn't even want the bread with it. I wanted to taste every bit of the tasty broth.
 
This soup is proof that it's not hard to make an extremely healthy and totally satisfying meal... FAST!

Saturday, April 30, 2011

Heaven for less than Seven!

All the Homemade Chocolate Covered Strawberries you can eat.... for less than $7!

I walked into the grocery store yesterday to see organic strawberries on sale for $1.99. I was inspired! Who doesn't LOVE chocolate covered strawberries? I swoon anytime I see them! I rarely can afford to buy them, and I found that making them myself can not only save me money, but allow me to eat as many as I desire! Three is never enough, right!?!

So, the strawberries were $2 and I got a block of gourmet chocolate for less than $5! I melted the chocolate in a bowl that rested in a pot of boiling water (I don't have a double boiler), dipped the berries in the hot melted chocolate and placed them on a wax paper lined baking sheet. Once they were all dipped, I put them in the refrigerator for about 15 minutes to chill. We ate nearly all of them very quickly, with the help of our good friends Eliza and Aaron. We were in heaven!!! This treat is so easy, inexpensive and absolutely DIVINE! I urge everyone to go get some strawberries while they are in season and treat yourself to heaven!


Friday, April 8, 2011

Sleeping Beauties

MMMMM Meringue Cookes!

These Sleeping Beauties were made with Heath Bar pieces! Wow!


 Meringue cookies have always intrigued me. I finally got to make them for the first time about a year ago. These heavenly little cookies go to bed when you do. They actually "cook" over the course of several hours in a shut off oven that started at 350 degrees and is turned off when the cookie sheets go in. When you wake, they are crispy and chewy little delights. Yep, they're crispy AND chewy. Texture perfection if you ask me. I got the recipe from a this cool cookbook that includes a diverse mix of recipes compiled by my great aunt's church. There are so many interesting and wonderful recipes contributed by the good southern folks that attend Nacoochee United Methodist Church in the quaint little town of Sautee Nacoochee, in Northeast Georgia. Here is the tasty recipe by Carole Miller. I imagine that Carole has quite the sweet tooth.. like me!

Sleeping Beauties 
2 egg whites
2/3 cup sugar (I used a little over 1/3 cup and that was plenty!)
1/4 tsp. cream of tartar
1/2 tsp. vanilla
1 cup chocolate chips 
1 cup chopped pecans (optional)

Preheat oven to 350. Beat whites to peaks; add cream of tartar, then the sugar, a little at a time. Stir in chocolate chips, pecans and vanilla. Drop on foil or parchment lined cookie sheets. Put in oven, turn off and leave overnight or for at least six hours. (Supposedly) makes 55 servings.... I haven't gotten that many, but my servings aren't so small. 


Trying to be lazy about giving the recipe, I took a picture of it on the page in the book. It looked great in this post! Then, I realized that I could be violating copyright laws. It's a small town church cookbook, but still... What a moral dilemma! Since I typed almost exactly what the recipe said, I guess I felt it was necessary to mention that the "Spirit of The Sautee-Nacoochee Valleys" cookbook was published and printed by Cookbook Publishers, Inc in Lexena, Kansas in 2000.

Thursday, April 7, 2011

What's For Dinner - B-for-D!

Oh, the good ol' fail-safe Breakfast-for-Dinner! It saves the day when it's 7:00pm and you have no meal planned. Here are a couple of ways we have enjoyed it, tonight and last Friday.


Tonight, it was..
 Fried eggs, baked turkey bacon and garlic potato pancakes.


And Friday, we had..
Home grown kale, sauteed in white wine and garlic. We poached the eggs in the pan with the kale. They were slightly overcooked, but delicious nonetheless. It's served on top of crispy homefries and onions.


*These yummy, healthy meals were almost completely free range and organic. It tastes better!*

Wednesday, March 30, 2011

AppeSnack!

Meet the treat that inspired Nate to say the word AppeSnack.


My old roomie John told me about this fresh and light tasting treat. Fresh endive with Boursin cheese. It's the perfect Appetizer/Snack to nosh on while you cook dinner. It's not always easy to catch fresh endives at the grocery, so grab'em while you can! 


Wednesday, March 23, 2011

Excited about Brussells Sprouts


My grandma's old steamer pot jumps for joy! It's because the amazingly healthy and tasty Brussells Sprouts are cooking inside. Did you know that this cruciferous vegetable is rich in fiber, protein, antioxidants and has even been linked to reducing cholesterol and the risk of cancer? Amazing stuff! In fact, there are so many health benefits, you should check out this website to get the complete nutrition facts. You'll jump for joy too! They're so tasty and SO good for you!

Tuesday, March 22, 2011

What's For Dinner - Pasta & Steamed Artichokes!

Simple whole wheat pasta with tons of garlic, sauteed with olive oil, spinach from the garden, baby bellas and black olives. I added a touch of salt & pepper but the bold garlic flavor required little addition. Of course, it had to be topped with freshly grated parmiagiano reggiano.


We steamed 3 artichokes for about 30 minutes. It probably could have cooked for longer. It was supposed to be the appetizer, but we didn't realized it took that long! Dipped in freshly melted butter, it tasted dreamy. 


I think the black olives and parm were the only un-organic elements of this meal. We are slowly trying to convert as many of our staples as possible. It takes time, as it is NOT a cheap endeavor. But, the taste makes it sooooooo worth it!

Sunday, March 20, 2011

New feature for my current and future followers!

Thank you to all of my wonderfully supportive readers & "Followers"! I LOVE working on this blog and your support keeps me inspired! I hope to increase my following and to make a difference in your lives in the kitchen.

Staying up to date on my posts just got easier! You can now submit your email address (at the bottom of the page, above the follower's list) and get emailed every time I post something new. Don't worry, you won't be getting emails every day.. I am lucky if I can post more than 2 times per week. I don't want Facebook to be my only outlet for sharing the new posts. Depending on when I share it on Facebook, you could miss my latest post if it gets lost in your new feed.   

I hope that all of my current followers will consider submitting their emails! I would love to know that people are consistently reading my blog. Thank you and I hope you will keep Sharing the Food Love!

Wednesday, March 16, 2011

Family Treasures

My Great Grandma Bryant's Chocolate Meringue Pie

Sorry folks, I won't be sharing this family recipe. I am the 4th generation to carry on this recipe. There is something so comforting about this pie. It takes some patience to master, but it's so worth the tired arm from the constant stirring!

  This pie won the "Family Recipe" Cook-Off in 2008 when Nate & I hosted our last Cook-Off at Dolphin Head on Hilton Head Island. The photo shown here was my first stab at the recipe. Turned out with perfect peaks! The one I made for the competition had a pathetic, fallen meringue. Apparently, looks aren't everything and the incredible taste took the cup! Made my Momma proud! I wonder if anyone else in the family has won a competition with it. 
 ~
I have a challenge for you, my readers. What is your classic family recipe? The one that must be served at every special family dinner.. or else someone is in trouble! Have you tried making it yourself?  Can you make it just like _____ used to make? Give it a shot & tell me how it turns out. It feels so good to be able to carry on a tradition.... and to enjoy the comfort of that special taste that brings back so many memories.

Sunday, March 13, 2011

What's For Dinner - Miso Soup, My Way

On a whim, I bought some white miso paste at the grocery store and decided I would give the soup a try. (But of course, with my personal touch.) I searched online for some basics on how to make it and took it from there. The most important thing about making miso soup, I learned, was that you can't let the miso boil. No problem.

I already had tofu and baby bella mushrooms in the fidge. I picked some kale from the garden. (Yes, it survived all winter, through a few dumpings of snow.) I had some chopped chives in the freezer that we harvested from the garden at the end of the season. It really helps when you have good stuff in the fridge at all times. You could be really creative with this recipe, I think. It was so easy!

This is how I made it:
I added the kale and green onion to 6 cups of water and brought almost to a simmer before adding a table spoon of Chicken flavored Better Than Bullion paste. (In stead of the bullion paste, you could just replace 1 or 2 cups of water with chicken or veggie stock.) Once dissolved and barely simmering, I added half a block of cubed tofu and a few thinly sliced mushrooms. I let it cook a few minutes on low heat, almost but not quite simmering. Once the mushrooms seemed barely cooked, I removed the pot from the heat. I ladeled out about 1 cup of the broth into a measuring cup and dissolved the miso paste in it. I used about 3 tablespoons of paste total, dissolving  about 1 cup broth to 1 tablespoon at a time then dumping back into the pot of soup. I tasted it once all mixed and added a few shots of liquid aminos to add some soy sauce flavor. No salt or pepper and it turned out delicious and miso-y! YUM!

I think you can really play and come up with many variations of this recipe. Of course, you could make it more traditional, with kelp and bonito. Or, you can just take what you have in the fridge and play with the amounts of water, stock, miso and veggies you use. Have fun!

Miso is very, very good for you. Check out this link to read about it's health benefits and get another (more traditional) recipe. NaturalNews.com on Miso Soup 

Monday, March 7, 2011

Artist & Philosopher.. I like that!

 In my planning of the blog, I found several great quotes about cooking and food. 
Here is one that I can relate to... 

“The true cook is the perfect blend, the only perfect blend, of artist and philosopher. He knows his worth: he holds in his palm the happiness of mankind, 
the welfare of generations yet unborn.”
- Norman Douglas (1868-1952)


Oh yes, in the palm of my hand. :-)

Sunday, March 6, 2011

Homemade Stock. It's easier than you think.

If you have the freezer space, it's a great idea to make your own veggie or chicken stock and have it on hand at all times. It adds the best flavor and nutrition to homemade soups and sauces, without all of the sodium you get in the store bought stuff. 

Making your own stock is pretty simple. It really just comes down to having the space in the freezer; for storing the veggies or bones and then storing your containers of stock after it's made. 

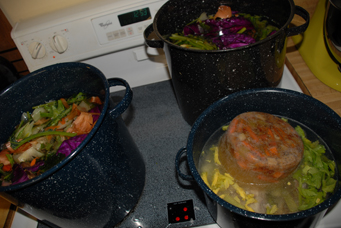
The photos shown here are of our most recent and long over-due stock making session. Unless you have 3 huge pots like us, you will probably want to make your stock once you have about 3 or 4 gallon zipper bags of veggies or bones. You will have less yield, but it will also take up less space in the freezer. We got 8 quarts of veggie stock and 2 quarts of chicken stock from this batch.


1. Start saving all of your unused vegetable stalks and skin and put in gallon sized freezer bags. You can even use onion skins! In separate bags, keep any chicken carcasses, cleaned of meat. Once you have a few bags full, it's time to make the stock.
 
2. Fill your large pot with veggies, pushing them down to fit as much as possible, leaving a couple of inches space from the top.


We put our chicken carcasses in a separate pot and put some old celery from the fridge in with it. We also saved the broth from cooking a chicken in a crock pot and added that to the chicken carcass/ celery mix. 
 
 3. Pour water over the veggies/carcasses until completely covered. 

4. Bring to a boil, then reduce heat, allowing to simmer, uncovered. Stir occasionally. Keep simmering for about 4-5 hours, until more than half of the water has cooked down and liquid is a rich brown color. Your house will smell amazing!

 5. Time to strain! Strain first with a regular colander and dump veggie pieces into a bucket or large bowl for composting.  Strain again, through a cheese cloth lined colander. For chicken stock, dump bones and large pieces into a trash bag and discard. 


Strained and ready to use chicken stock!


Vitamin packed vegetable stock!
6. Allow stock to cool in the pot before transferring to freezer safe containers. We like the quart sized screw top kind.

7. Write the date on the lid and put in the freezer. Try to use within a couple of months. We try to use all of our frozen stock before making a new batch.

It just makes sense for us to make stock. We are taking up less space in our kitchen compost bucket and can dump it less often, since all of our veggie parts are going in the freezer. We are getting all of the health benefits from those inedible or unappealing parts of the vegetable skin and stalks. We are saving money because we are utilizing every part of the vegetable or chicken, creating little to no waste. Once the veggies are all cooked down, they end up in the compost anyway, only most of the work for breaking it down in compost is already done when it gets there. Making the stock requires little hands-on time and we actually save time by having stock on hand, instead of having to get it at the store. And, by not getting it at the store, we are reducing our intake of sodium and other additives that are in the store-bought kind. It's a small commitment of time for such great rewards! Did I mention that it tastes amazing too?

Saturday, March 5, 2011

Chocolate Chip Cookies - Healthier And Just As Tasty


I got this adorable card for my birthday from Nate's Mom, Vicki. She really knows me! I don't allow myself to keep all of the cards I get. (I have too much clutter already.) But, I think I will have to hold on to this one! It inspired me to write this post, sharing 3 modifications to a chocolate chip cookie recipe to make them (a little bit) more healthy. These are so soft and delicious that I could eat them all of the time. (I'll try not to.)


If you are going to make cookies, why not try to make them as healthy as possible? Then, you don't have to feel as guilty about how many you eat. Not even the ones you sneak late at night while no one is watching!  After making cookies, I always wake the next day to having far fewer cookies than I had when I went to bed! Nate is more of a cookie monster than I am!


Tip # 1: Always use oats!
They add a more flavor, texture and nutrition! Oats have so many health benefits, from reducing cholesterol, reducing the risk of cancer and helping to regulate blood sugar and blood pressure. (Read more at eatmoreoats.com.) Oatmeal Chocolate Chip Cookies may not be the best (or only) way to get your oats, but every little bit helps! 

Tip #2: Replace butter with apple sauce!
We live in apple country, so we have canned local apples for the past two seasons. Last year, we canned at least a dozen quarts of apple sauce! This stuff is so smooth and sweet and has absolutely no additives (except maybe a dash of citric acid for better canning). For your cookies, any cookies really, replace equal amounts of softened butter with apple sauce. You don't have to can your own, but it sure does taste better! We like having it on hand at all times, as another one of those pantry staples. Keep the oats on hand too and you can make yummy cookies anytime.

Tip #3: Use whole wheat flour!
This tip applies for pretty much any baking. We have started replacing all recipes calling for all-purpose flour with organic whole wheat. The flavor it brings is subtle, yet it makes breads, cakes and cookies have a slightly more complex taste.

The Recipe:
So, I am not so advanced in my cooking that I come up with all kinds of recipes on my own. Maybe one day. For now, I look at recipes I find on the internet, or on the side of the box of oats and I modify them. I also like to combine aspects of several different recipes to get what I want. My cookie recipe came from the Quaker oats box. I have included my modifications here. Hope you enjoy!

Oatmeal Chocolate Chip Cookies 
Ingredients:
-1 cup apple sauce
-1 1/4 cup brown sugar
-1/2 cup sugar
-2 large eggs
-2 tablespoons vanilla
-1 3/4 cup whole wheat flour
-1 teaspoon baking soda
-1/2 teaspoon salt
-2 1/2 cups oats
-2 cups chocolate chips

*Heat oven to 375 degrees
*Beat apple sauce and sugar until creamy.
*Add eggs, milk & vanilla. Beat well.
*Add flour, baking soda & salt. Mix well.
*Fold in chocolate chips 
*Drop onto ungreased cookie sheet.
*Bake 9-10 minutes for chewy cookies. (They may not look totally done when you remove from oven.)
*OR Bake 12-13 minutes for crispier cookies. (You will probably never achieve a fully crispy cookie from this recipe. The apple sauce adds so much moisture, that we have never had dry or crispy cookies when using it.)

*Other modifications: Instead of chocolate chip cookies, try mint chocolate chips, dried cranberries with white chocolate chips or with nuts and pumpkin seeds. There are endless combinations!

Sunday, February 27, 2011

3 Good Food Highlights From This Week

1. A good reason to have fruit in the freezer at all times.....

Homemade Blackberry Syrup
We ran out of maple syrup and really wanted buckwheat pancakes for breakfast. Nate had just gotten these organic blackberries from the store and didn't have any plans for them, so he cooked up a syrup. A very yummy and decadent meal!


2. Yummy Comfort Food

 Cauliflower Soup
The beautiful organic cauliflower that I got on sale inspired me to make this creamy comfort food. I topped it off with our homemade croutons. Yum! I easily found an amazing recipe on another food blog. Follow the link to get it: Cauliflower Soup Recipe from Pioneer Woman. So, her blog is much more professional than mine, as she is a published author and photographer.. but it's very inspiring!

3. A tasty birthday cake for Jeni


My First Homemade Carrot Cake
I made this pretty cake for my friend and coworker Jeni's birthday. I got the recipe for the cake and icing from the cookbook of my favorite Athens restaurant, The Grit. A fun but very time consuming cake. I got more than one "best carrot cake ever" comment, which made it worth every minute!

~

Your feedback is welcomed! Please let me know if you want a recipe or have any suggestions for posts. This blog is as much for you as it is for me! Thank you for your support and please share with your foodie friends!
  

Sunday, February 20, 2011

Healthy Comfort Food

Last night's dinner is one of my wintertime favorites. One of the best things about it is that we can usually have this meal any time; we always have the ingredients on hand. We just have to get a crusty baguette for the side and that is not even completely necessary.


Tomato and Rice (or Barley) Soup


Nate found a delicious recipe for Tomato and Rice Soup, which we have modified several times. We use our home canned stewed tomatoes, chicken stock and either rice or hulled barley. It gets topped with our homemade croutons and fresh grated parmesan cheese. I have become a believer that if you have a well stocked pantry, you can come up with a delicious & nutritious meal anytime. This meal is a very good example. The hard work done at the end of the summer to can several quarts of fresh local tomatoes, pays off when you can enjoy it all year long. We have also started saving stale bread and baguettes in the freezer for making large batches of croutons. We freeze the croutons once made and we now have those on hand most of the time. Grains like brown rice and barley and vegetable or chicken broth should always be in the pantry too! We make our own stock and store in the freezer, but more on that in a future post.....

To make it:

Cook your rice or hulled barley (1/2 cup or more if desired) in at least 2 cups of stock (from a 32 oz container). Once boiling, cover & cook for about 30-45 minutes. It's nice for the rice to be on the soft side and the barley will take closer to 45 minutes. You don't want the grains to absorb all of the liquid, so add more stock if it's getting too dry.

Once the rice or barley is cooked, add several cloves of minced garlic, about 3 tablespoons of olive oil and as much salt & pepper as desired. Stir and as soon as it begins to simmer again, add 1 quart of canned tomatoes. Ours had large pieces of tomato, so I used a smasher to break them up. Rinse the empty tomato jar with stock & dump that in.  Stir in the remaining stock and bring it to a simmer before serving.

Top your bowl with croutons & fresh grated parm. Garnish with celery greens, if you want to add some color. Serve with warm, crusty bread.


As pretty as it is TASTY!!
Nate added black olives to his bowl this time. Pretty tasty!


Friday, February 18, 2011

Sharing the cobbler love...

Mmmmmm Cobbler!
Besides eating raw, this is the BEST way to enjoy fresh fruit, in my opinion. Fresh local peaches... blueberries... even with my homemade apple pie fillin'. I'm new to the cobbler game, but the experimentation has been very fun! 

I did some online research, combined a few of my favorite recipes and made it my own. This time I added some oats to the dough. It was crispy on top, soft & gooey on bottom. I enjoyed this summery treat with the frozen blueberries we picked at Graveyard Fields* this August.

Of course, it's best enjoyed with fresh vanilla ice cream .... dreamy!

You asked for it.. Here's the recipe:

Ingredients:
1/2 cup butter
1 cup flour   
3/4 cup sugar (for batter)
1/2 cup sugar (for fruit)
2 tablespoons baking powder
1/2 cup milk
4 cups fruit (be creative!)
A few tablespoons of brown sugar & cinnamon (for topping)


Melt butter in a 2&1/2 quart baking dish, in a 350 degree oven.
Combine flour, sugar (3/4 cup), baking powder & milk.
In a separate bowl, combine sugar (1/2 cup) with fruit.
You can add 1-2 cups of water to the fruit if you want a moist cobbler. 
Now for putting the stuff in the buttery hot pan to bake. You have 2 options:
1) Spoon the batter into the pan, mostly covering the bottom of the pan. 
Then cover with the fruit, finally sprinkling the brown sugar & cinnamon mix over the top.
OR...
2) Add the fruit to the buttery pan first, then cover with the batter & top with brown sugar & cinnamon.
This has been my method of choice. The results have never disappointed!
Bake in (already) 350 degree oven until it's browned to perfection. 
Time varies with the moisture of the mixture.. maybe between 10-15 minutes.

I love the seemingly endless ways I can modify this recipe. There are so many varieties of fruit that you can use to get the 4 cups it calls for! The oats I added (as pictured) made it nice and crispy and gave it a more complex flavor. I also like to think it made it more healthy! I hope you can have fun with this one too. Please, let me know what you come up with!


Sunday, February 13, 2011

Fun Food Finds & What's For Dinner

Today's Fun Food Find comes from our awesome local discount grocery, Amazing Savings. You can find some of the weirdest food products with super low prices. Questionable expiration dates don't deter us most of the time. Has anyone ever tried this one? In can or not? Comments are welcome!

~~~~~~~~~~~~~~~~~
What's for Dinner?

Craving comfort food, we got out some of our homemade vegetable stock from the freezer to make chicken noodle soup. We had leftover chicken, so I pulled it off the bone, chopped up some celery & carrots and added some frozen corn to the stock. We added a little parsley, celery greens and a teaspoon of Organic Chicken "Better Than Bullion" for some extra flavor. Egg noodles would have been perfect, but the tiny Fideo noodles will have to do. (It's like the noodles in cup o' noodles, so it works.) I love it when a cozy meal like this turns out to be so easy & and cheap!